The Game Boy Color is an interesting piece of hardware. In some ways it’s a significant upgrade over the original Game Boy (it has color!!), but in other ways it feels like a minor hardware revision despite releasing 9 years later.
Well, let’s see what it takes to make a Game Boy emulator support Game Boy Color software!
Getting Started
First of all, the emulator needs to make GBC games think that they’re running on a GBC. Otherwise you’ll get lock-out screens like this:
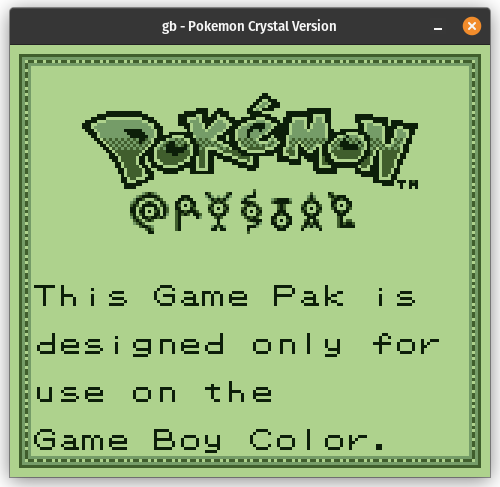
Pan Docs describes what games are looking for, which is that the CPU’s accumulator holds the value $11 at boot. The GBC boot ROM writes $11 before handing off control while GB boot ROMs write other values, typically $01.
This immediately brings up the question of how to handle behavior differences between Game Boy and Game Boy Color. Technically we could always initialize the accumulator to $11, but it’s kind of nice being able to boot GBC games while emulating a regular Game Boy - some of them have neat lock-out screens like this. (And later on there will be features that require distinguishing between GB behavior and GBC behavior, like pixel rendering.)
I’m just going to use an enum for this:
|
|
DMG is Nintendo’s model name for the original Game Boy and CGB is the model name for the Game Boy Color. From now on I’m going to use these abbreviations because they’re more distinguishable from each other than GB and GBC.
For identifying CGB-compatible software on the emulator side, there’s a byte in the ROM header that indicates whether the software is:
- DMG-only: Does not work in CGB mode
- CGB-enhanced: Works in either DMG or CGB mode, and will use CGB features if in CGB mode
- CGB-only: Works only in CGB mode, and will most likely show a lock-out screen if run in DMG mode
How you determine which mode to use is really a frontend/UI thing. I’m going to default to DMG mode for DMG-only games and CGB mode for CGB-enhanced + CGB-only games, while offering the option to force DMG mode for CGB-enhanced or CGB-only games.
Downloading More RAM
Before going any further, it’s helpful to look at the specs differences between Game Boy and Game Boy Color:
| Game Boy | Game Boy Color | |
|---|---|---|
| CPU clock speed | 4.194304 MHz | Swappable between 4.194304 MHz and 8.388608 MHz |
| Working RAM | 8 KB | 32 KB (8 x 4 KB banks) |
| VRAM | 8 KB | 16 KB (2 x 8 KB banks) |
| Supported Colors | 4 | 32,768 |
| Color Palettes | 1 background + 2 sprite | 8 background + 8 sprite |
This doesn’t completely cover the differences, but it highlights some of the most important ones. In particular, CGB software will generally not work at all without at least emulating the additional RAM.
The Game Boy memory map doesn’t have room to fit more RAM, so CGB mode adds two new registers that enable memory banking of VRAM ($8000-$9FFF) and the second half of WRAM ($D000-$DFFF). The first half of the WRAM area ($C000-$CFFF) is always mapped to the first 4KB of WRAM.
One insight that makes the code slightly simpler is that you can still do memory banking in DMG mode - just don’t allow software to write to the memory bank registers, which causes the default banks to always be used. In fact, that’s a good thing to do for all of the new registers in DMG mode - ignore writes and have reads return $FF.
Implementing WRAM and VRAM banking gets some games to boot and run, but…well…
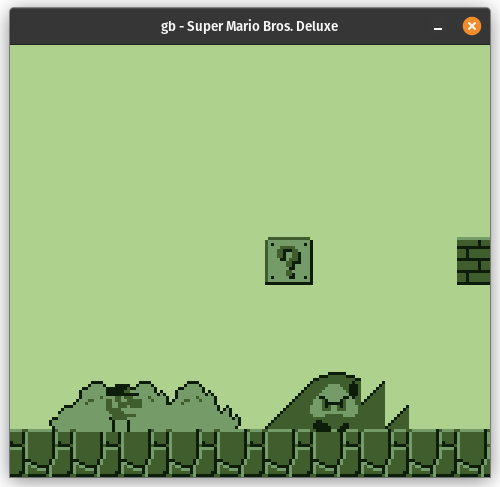
Yeah, there’s more work to do.
VRAM DMA
This seems as good as any a time to cover VRAM DMA, which GBC games tend to use all the time because it’s faster than using the CPU to copy data from ROM/RAM to VRAM.
There are two types of VRAM DMA: general-purpose DMA (GPDMA) and HBlank DMA (HDMA). GPDMA does a bulk copy all at once much like OAM DMA, while HDMA automatically copies 16 bytes per HBlank period during active display. GPDMA is much more commonly used - HDMA doesn’t have as much utility as it does on the SNES since all it can do is copy data into VRAM.
One important thing to note is that unlike OAM DMA, VRAM DMA halts the CPU while the DMA controller is actively copying bytes. For GPDMA, this means the CPU is halted until the entire transfer completes. For HDMA, the CPU is halted for a short time near the start of every HBlank period (until the 16-byte chunk is transferred), but it can otherwise execute normally.
GPDMA isn’t too hard to emulate. While not completely accurate, you could do the copy to VRAM all at once when the CPU initiates the DMA, and then just count how many cycles the CPU should stay halted for while you run all of the other components.
HDMA is trickier and it has some quirks that games do depend on. The main ones are that software can read the current HDMA status via the new HDMA5 register (the same one used to initiate VRAM DMA), and software can also cancel an in-progress HDMA by writing to HDMA5 with bit 7 clear. Pokemon Crystal in particular is very sensitive to getting this right or its graphics will be heavily corrupted.
Some games don’t use HDMA at all, so you could start with just GPDMA and emulate HDMA later.
Tile Data Banking
Now that software is (hopefully) populating VRAM, we can start to work on rendering changes.
First, a quick overview of how VRAM is organized in DMG mode:
- $8000-$8FFF: BG tile data area 1 / sprite tile data area
- $8800-$97FF: BG tile data area 0
- Yes, $8800-$8FFF is included in both tile data areas
- $9800-$9BFF: BG tile map 0
- $9C00-$9FFF: BG tile map 1
CGB mode adds a second 8KB bank that is organized mostly the exact same way. $8000-$97FF in the new bank stores additional tile data, and $9800-$9FFF augments the BG tile maps with additional attributes (more on that in a bit). For sprites, the previously unused bit 3 in the OAM attributes byte is now used as a selector for whether the sprite’s tile data is stored in VRAM bank 0 or VRAM bank 1.
I’m using VRAM addresses from the CPU’s perspective for convenience, but note that the PPU can always access the entire 16KB of VRAM at any time. It does not care at all what bank is currently mapped into the CPU’s memory map via the VBK register. If the PPU needs to look up tile data that’s stored in VRAM bank 1, it simply reads from the second half of VRAM instead of the first half.
Implementing this for sprites makes things look…a little better. At least Mario is using the correct sprite now:
![]()
But why do some of the background tiles look flipped?
Backgrounds Can Have Attributes Too
In DMG mode, sprites have several attributes including horizontal/vertical flip flags, a low priority flag, and a palette selector bit. There’s no such equivalent for background tiles - the only thing stored in the tile map is the tile number. CGB mode changes that!
$9800-$9FFF in VRAM bank 1 stores background tile attributes, with each byte corresponding to the tile map entry at the same address in VRAM bank 0. Unlike tile data, the tile maps must always be stored in bank 0, and that’s because of this new feature. If the PPU is looking up the tile map entry at $99A2 for example, it will read the tile number from $99A2 in bank 0 (just as it does in DMG mode), but then it will also read an attributes byte from $99A2 in bank 1 and it will use that when rendering pixels from that tile.
The background tile attributes byte contains the following fields, most of which are analogous to the sprite attributes in OAM:
- Horizontal flip
- Vertical flip
- Tile data VRAM bank
- Color palette
- High priority flag (causes non-transparent pixels from this tile to always display over sprite pixels)
Similar to WRAM/VRAM banking, you don’t actually need to special case BG tile attributes for DMG vs. CGB despite DMG not having the feature. Software can’t write to VRAM bank 1 in DMG mode, so the attributes byte will always be $00, and that happens to be equivalent to DMG behavior: no H/V flip, tile data in VRAM bank 0, no high priority flag. And palette is ignored in DMG mode because DMG only has 1 background palette.
Horizontal and vertical flip are easy to emulate: vertical flip just applies 7 - tile_row when determining which row of pixels to fetch from the tile, and horizontal flip just reverses the pixels when inserting into the FIFO (same as with sprites). Tile data VRAM bank is also easy to emulate as all it does is control whether the tile data lookup reads from the first half of VRAM or the second half.
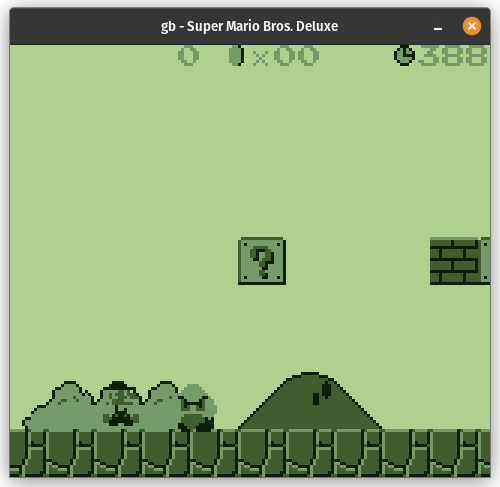
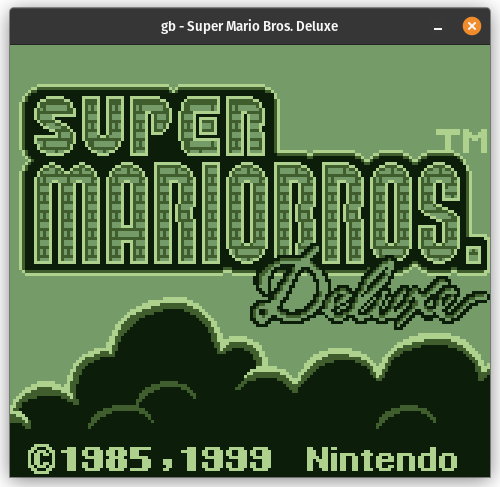
Emulating just those 3 attributes fixes quite a lot:
Back to the FIFO
To make any more progress, we need to revisit how the PPU determines what pixel to display at each position on the screen.
Here’s everything that changes in CGB mode, aside from anything color-related:
- BG/window tiles now have a high priority flag that, if set, causes non-transparent pixels from that tile to always display over sprite pixels
- Clearing LCDC bit 0 now forces the BG/window to low priority instead of disabling them completely. If LCDC bit 0 is clear, the sprite low priority and BG high priority flags are ignored, which causes non-transparent sprite pixels to always display over BG/window pixels
- Priority between overlapping sprites is now based on OAM index instead of X coordinate, which gives developers significantly more control over how sprites layer over each other
- In a pixel FIFO implementation, when adding a row of sprite pixels to the sprite FIFO, this means that new non-transparent pixels should replace any pixels that are transparent or that are from a sprite with a higher OAM index
This makes resolving color between BG and sprite pixels a fair bit messier, but something like this should work:
|
|
With that out of the way, there’s no more putting it off.
32,768 Colors
Yes, you read that correctly in the specifications up there. The Game Boy Color supports a whopping 32,768 different colors, as many as the SNES or the Game Boy Advance! So why do GBC games look so much less colorful than SNES and GBA games?
As you might have guessed from the fact that I was able to get anything at all to render without touching color, CGB uses the exact same tile data format as DMG: a bitplane format with 2 bits per pixel. That means no more than 4 different colors per 8x8 background tile and no more than 3 different colors per 8x8 sprite tile (since sprite color 0 is transparent and will never be displayed).
CGB does support more palettes than DMG, having 8 different 4-color background palettes and 8 different 3-color sprite palettes, but the 2bpp tile format still severely limits the number of colors that a game can display simultaneously compared to SNES and GBA. GBC can technically display up to 56 different colors simultaneously (32 BG colors + 24 sprite colors), but the 4-colors-per-BG-tile + 3-colors-per-sprite-tile limitation is a major restriction.
It is possible for games to modify the color palettes in between lines, and some games do this in order to render high-color artwork with more than 56 different colors, but it’s CPU-intensive to do this many times per frame and you are still limited to at most 56 colors per line. Rewriting palettes between lines is also much less practical for sprites which often move around to different parts of the screen as the game runs.
Anyway, compared to DMG, the only thing that really changes is how the 2-bit color values from tiles get mapped to display colors. The BGP/OBP0/OBP1 registers are no longer used in any way. Instead, CGB has 128 bytes of dedicated palette RAM, 64 for background palettes and 64 for sprite palettes. Colors in palette RAM are 15-bit values in the RGB555 format (hence the 32,768 number):
Bit     01234 56789 ABCDE F
Color   RRRRR GGGGG BBBBB -
For a palette P (0-7) and a color C (0-3), the display color is stored in palette RAM addresses 2*(4*P + C) and 2*(4*P + C) + 1 as a 2-byte value (little-endian).
The original sprite palette bit from OAM attributes is no longer used, and instead the previously unused lowest 3 bits are used as the palette. Background tiles store their palette in the lowest 3 bits of the background tile attributes byte.
Alright. First thing to emulate is palette RAM. It isn’t mapped directly into the CPU’s memory map - instead, the CPU accesses it through two data ports, one for background palette RAM and one for sprite palette RAM. The Game Boy doesn’t really have anything else like this, but video memory being accessible only through data ports is very common on other gaming consoles like the NES, SNES, Sega Genesis, etc.
On Game Boy Color specifically, the game writes a palette RAM address to either the BCPS/BGPI register (for BG palettes) or the OCPS/OBPI register (for sprite palettes), and then the next access to the corresponding data port will access that address in palette RAM. There’s also an optional auto-increment feature that makes the palette RAM address automatically increment by 1 after each data port write, for when games want to rewrite a large chunk of palette RAM at once (or all of it).
Once palette RAM is in place, the PPU side is very straightforward - after determining what pixel to display, go look up the display color in palette RAM based on the pixel type (BG/window vs. sprite), the palette, and the 2-bit color.
Finally, the emulator’s frontend needs to have different logic for rendering PPU colors because the color format is different between DMG and CGB. If your output format is RGB888, you can convert from the GBC’s RGB555 format by applying the conversion round(255 * N / 31) to each of the R/G/B components individually.
And we have colors! More than 4 of them, even!
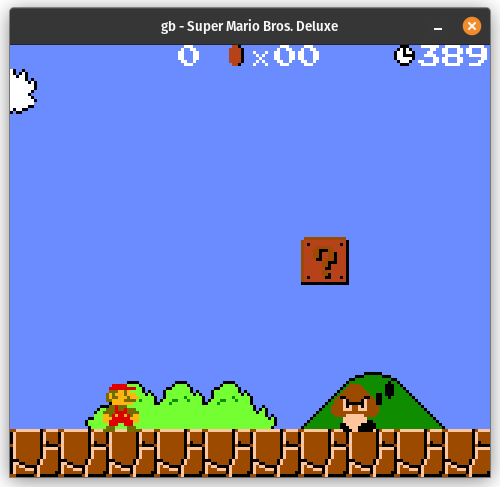
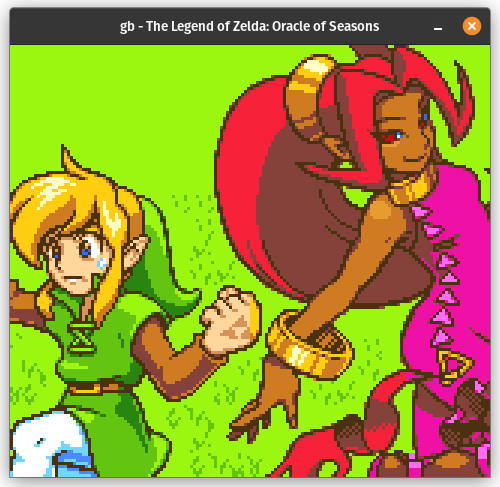
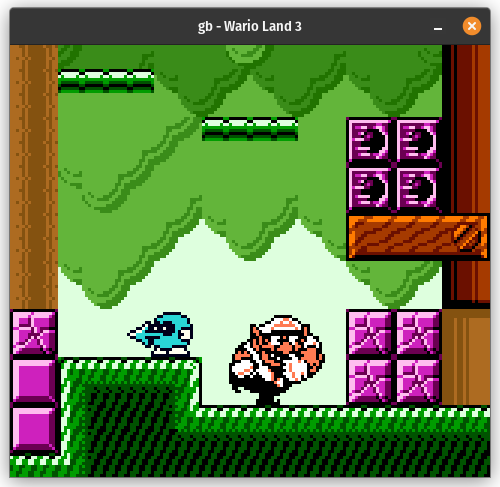
Double the Speed, Double the Fun
There’s one last feature that is required by most GBC games: double speed mode.
While the original Game Boy’s CPU is fixed at 4.194304 MHz, the Game Boy Color’s CPU can run at either 4.194304 MHz or 8.388608 MHz. Software can toggle the current CPU speed by executing the otherwise useless STOP instruction after setting bit 0 in the new KEY1 register. There are no downsides to running at 8 MHz except for draining battery life faster, which is admittedly a notable downside for a handheld console that runs on AA batteries.
The actual speed switching isn’t hard to implement but it has some tricky implications on timing. When double speed mode is enabled, components that are driven by the CPU clock run twice as fast alongside the CPU, while other components run at the same speed regardless of the current CPU speed.
More specifically: OAM DMA and the system timer also run twice as fast while the CPU is in double speed mode, while the PPU, the APU, and VRAM DMA run at the same speed regardless of CPU speed mode. The APU reads a different timer bit to clock its DIV-APU counter while in double speed mode, but that’s just to ensure that the frame sequencer continues to clock at 512 Hz instead of running twice as fast.
How hard this is to emulate depends on how you handle timing between the different components. I execute a function that does roughly this on every CPU M-cycle:
|
|
When the CPU is running in double speed mode, the timer and OAM DMA should continue to tick once per CPU M-cycle since they’re also running twice as fast, but the other components should be clocked at half the rate relative to the CPU: one VRAM DMA byte per M-cycle, 2 PPU dots per M-cycle, and the APU…well, continues ticking at ~4 MHz.
The simplest way to handle this is to tick VRAM DMA + the PPU + the APU in exactly the same way, but only do so on every other CPU M-cycle rather than doing it on every CPU M-cycle. You lose a tiny bit of timing accuracy by doing this, but I’m going to assume that nothing depends on that level of accuracy except for test ROMs that are designed specifically to test it.
That makes the function look something like this:
|
|
Double speed mode may be harder to implement than that depending on how you handle timing. I time my emulator based primarily on audio sync, so I don’t need to explicitly track clock speeds or how many cycles should execute per second or anything like that. The APU is what ultimately determines emulator speed when using audio sync, so running the APU half as fast relative to the CPU makes the CPU run twice as fast in absolute terms while the APU stays at the same speed.
Color Correction
That’s it for actual Game Boy Color functionality that needs to be emulated, but there’s one more thing that I think is worth mentioning.
Converting from the GBC’s RGB555 colors to RGB888 using round(255 * N / 31) works, but it’s not accurate to how those colors would have looked on an actual Game Boy Color LCD screen. The GBC LCD screen tends to somewhat darken brighter colors while also somewhat blending the color components. GBC graphics were designed for its LCD which means that this naive conversion causes some games to look very oversaturated compared to actual hardware.
For further complications, Game Boy Color games are also playable on the Game Boy Advance and the Game Boy Advance SP through backwards compatibility, and those systems have their own LCD screens that present colors differently than the Game Boy Color’s LCD screen. Some games even detect when they’re running on a GBA and use brighter colors to account for the very dark GBA screen! There isn’t a one-size-fits-all solution here.
Here are some examples of what basic correction looks like:

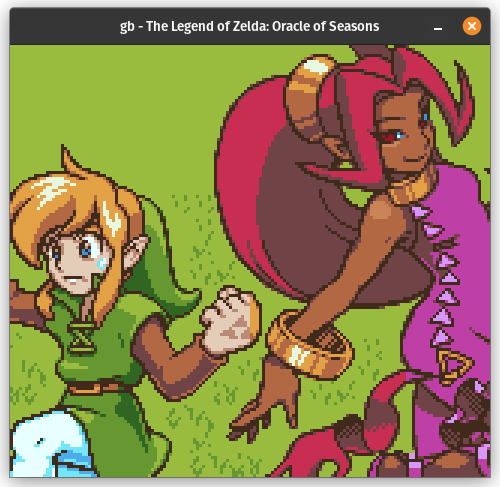
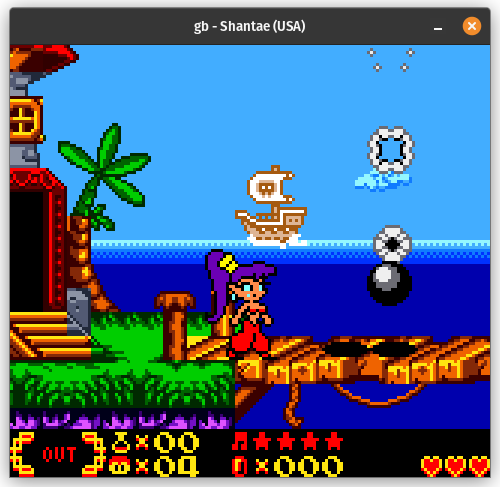
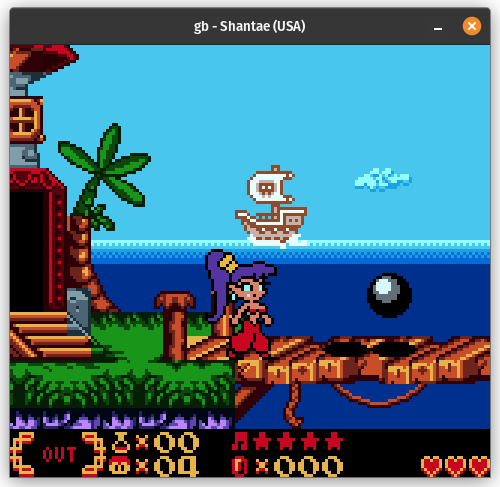
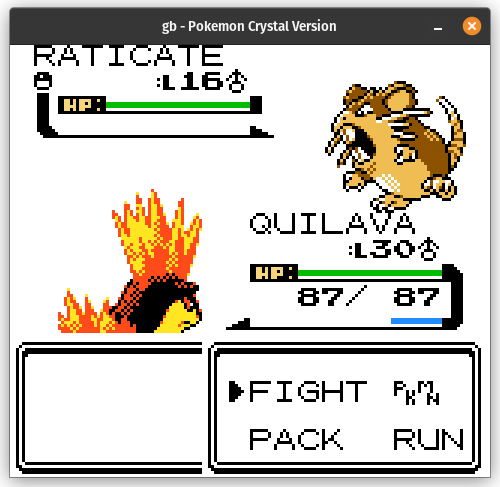
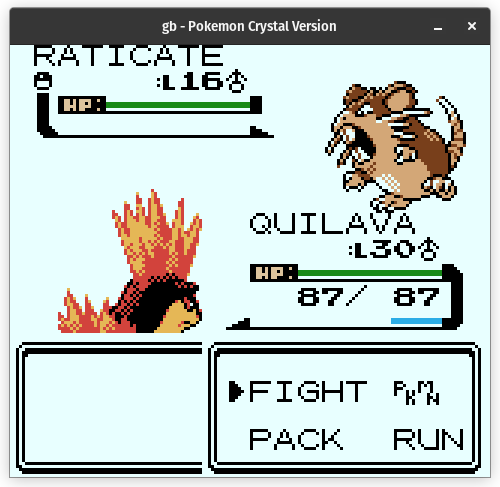
You might prefer the first images and feel that color correction isn’t even necessary! Or you might feel that some games look better with it and some games look better without it. It’s subjective. There are also different methods of color correction that produce different results, or even just the same method using different parameters. Some people like to apply a darkening filter in addition to modifying the colors in order to account for the LCD screen not having a backlight.
As for the “how”, a fairly simple approach is multiplying the original R/G/B color values with a 3x3 matrix of constants to produce new R/G/B color values. Some emulators do color correction in a GPU shader, but the Game Boy Color resolution is low enough that you can easily get away with doing it on the CPU. You could also precompute a lookup table containing the corrected R/G/B color values for all 32,768 possible input colors, which is only 96KB (or 128KB if you store as RGBA).
In Summary
So, after that deep dive, here’s a much higher level overview of what CGB added/changed compared to DMG:
- RGB555 colors instead of 4-color display
- 8 BG palettes instead of only 1
- 8 sprite palettes instead of 2
- Background/window tile attributes
- VRAM DMA
- Option to run the CPU twice as fast
- 4x as much working RAM
- 2x as much VRAM
- Priority between overlapping sprites is based on sprite table indices instead of X coordinates
- An infrared communications port (which I did not cover, few games use it for anything important and the GBA dropped it entirely)
From an emulation perspective, it’s very much a bunch of little things to implement rather than a significant overhaul. The upgrades are certainly nice for games though.